

Installation of underground irrigation
Post from EditorialsDIY project of an underground irrigation system in your garden. The underground irrigation will make our garden more beautiful and vital for fans of the green.
Water is a precious

The benefits of an underground irrigation system are indisputable.
The irrigation underground streamlined and constant, will make our garden more beautiful and vital and automatically evoke in us a passion for green archaic.
Let's not forget that this facility will help us in times when we are away from home, maybe on vacation.
But now a question starts to come forward in our heads:
We realize we have an irrigation system buried in our garden, without using any technical? Answer: YES!
The important thing is which system is best suited to our needs, we see what may be the different versions of the system:
- For over 200 sqm gardens - Plant basement with a minimum of 6 zones;
- For gardens from 50 to 200 square meters - underground system (Hummingbird CLABER ) with up to 2 zones;
- For gardens and terraces not more than 100 square meters - above ground plant with only one zone programmable;
- For balconies, terraces and small enclosed spaces - System Oasis CLABER to irrigate up to 40 days of battery life.
We exclude the last case that we will discuss in a future article and move on to the first stage: the design.
1st stage: the design of an irrigation system underground
 Bring paper, pen and meters, measured Draw it in your garden and plant.
Help yourself with the graph paper using a ratio of one meter (actually) a = cm (paper), you can get a big help by drawing directly on the computer with CADCASA
Now it is divided into areas of the garden.
Consider that each zone can support a maximum of 5 pop-up (are the pop-up sprinklers), there are calculations which take account of the pressure drop due to friction that exerts the water in the pipes, so the greater the diameter of the tube, the lower the pressure drop of the flow rate is increased as well as the pressure.
To sum pop-up with a pipe diameter of 3/4 of an inch and an initial pressure of 3 bar a pop-up has a radius of just over 4 meters.
Back to our project and helping us with a compass on paper ubichiamo projections of pop-up irrigation also designing the center that will be precisely the location of the sprinkler.
Remember also that some pop-ups are jet adjustable from 0° to 360°.
Step 2: Install battery solenoid
 The battery of valves is the set of solenoid valves for opening and closing the circuit.
General rule, the diameter of the tube used to connect the battery of valves to the service line, it should not be less than the diameter of the valves.
Installed upstream of the solenoid valves of the circuits, a gate valve in order to isolate the entire plant, for example for maintenance work.
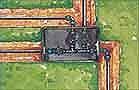
Step 3: Draw the irrigation system buried in the ground
After designing the system now is the time to trace the path of the pipes on the ground of the individual circuits of irrigators. 
Plant for the land of the stakes at each point where there is a sprinkler.
With a draw string on the ground with lime powder, the location of pipes for irrigation.
Step 4: dig ditches
 With a spade to dig a channel along the path with minimum depth of 20/25 cm.
To avoid damaging the turf just spread a plastic sheet on which to pour the excavated soil.
For the manifold choose a polyethylene tube, easy to assemble with the fittings also polyethylene, just a simple hacksaw for iron.
Step 5: install underground sprinklers irrigation
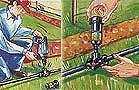 After positioning the tube along the way, we're going to place our second project, the pop-up sprinklers. Are easy to install outlets bracket (A), where once positioned, just screw the two bolts on the sides and drill pipe with a drill and a drill bit 10 mm.
Then the extension (B) are cut to length with a hacksaw and clean edges to finish with a scraper before installing pop-up.
6th step: testing the circuit irrigation
Before laying underground pipes and sprinklers, us ensure that the sprinkler head is flush with the floor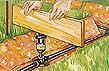 turf, we also recommend to carry out a test that will allow us to check for leaks in the fittings and get a perfect coverage of irrigation.
7th step: closing trenches
 Now we can rinterrare excavation by placing the surface turf or riseminandolo. It 'should now drain the residues of soil infiltration during processing, just unscrew the heads of the pop-up and let water flow in pipes.
Conclusion on the plant irrigation
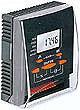 Now that our facility is ready, we devote some space for programmers.
These operate at 24 volts AC, so remember that needs a transformer 220/24 V, there are various types 2-4-6 zone in the second note of the size of the garden, irrigation system are the heart open and close the solenoid valves up to 6 times a day, have an internal battery for outages and associated with another useful device called a rain sensor avoids wasting water by suspending the start of the sprinklers in case of rain.![]() When the internal float reaches a level equal to 5 mm. of rain per square meter stops the operation of an irrigation system.
When the internal float reaches a level equal to 5 mm. of rain per square meter stops the operation of an irrigation system.
For those who have a garden of modest size and wants to take advantage of this great benefit, we recommend the DIY system of CLABER Hummingbird.
For the purchase of equipment we recommend the products CLABER, can be found in all the Centres DIY, gardening and the best hardware stores.
80952 REGISTERED USERS


Joined the REA 841143/NA 26/01/11. Capital fully paid 15.77 k.
Publisher writing to R.O.C. Registry Operators of Communication to the number 20714 on 01/31/2011