One head angular wall: DIY building mode
Post from EditorialsOne head angular: construction phases represented with drawings, to create precise geometric, solid and symmetrical structures in DIY mode.
The corners act as structural support for the external walls
The one head stone walls, that is, made of the superposition of the individual rows of bricks placed longitudinally in sense head-to-tail, may be relatively weak from a structural point of view especially if they exceed a certain height.
In order to make them stable and robust, you can support them through the insertion of pillars and intermediate terminals along their course.
Alternatively, for simple garden walls of medium height, can be strategic, where possible, the construction of right angles that, if implemented accurately represent real self-supporting structures for the masonry in its entirety.
How to draw on the foundations the angular wall
In a previous article, I described the construction of foundations for small outer walls; in the specific case of a low one head wall developed up to a meter in height, I advice to provide foundations dimensioned according to a depth of at least 15 cm and a width of 30 cm approximately.
Once filled the excavation with concrete, wait for the time necessary so that it reaches the optimum consistency of the cement matrix.
On the foundations must be traced the outline of the wall taking great care and precision to the corner portions, the purpose made construction is a prerequisite for the stability of the structure.
This operation shows the pencil marks on the foundation joining them through a simple wooden rail, checking the accuracy of alignment and the geometric precision in the corners using the special mason square ruler.
The corners are the first to be built, they will have to be perfectly at 90°, dedicate all the necessary time in this delicate phase.
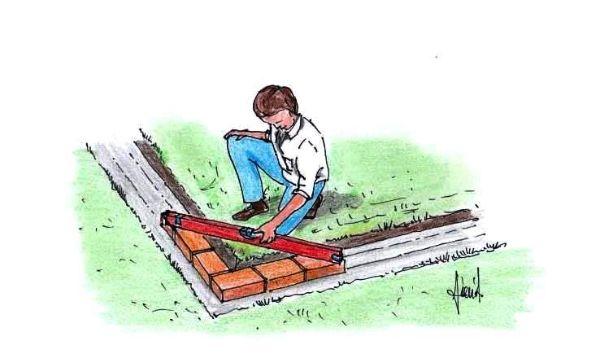
Spread the bed of mortar binder, three bricks are laid along the two axes perpendicular to one another previously tracked.
To check the perfect level to floor level in all directions, even diagonally, you must lay the level on the terminal bricks, as I indicated in the above drawing.
Correct building of the wall corner
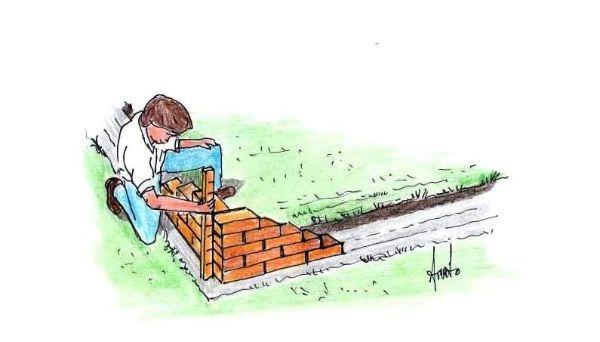
Build the corner up to the height of five rows of bricks arranged in steps, taking care to measure the alignment of the various layers using the graduated rod, as I have shown in the following depiction.
To form the corner are placed, alternating, head and side bricks.
With the spirit level check the perfect verticality of the angle and alignment on both sides of the wall under construction; You should repeat several times to ensure accurate squareness.
Construction of the linear low wall between the two corners
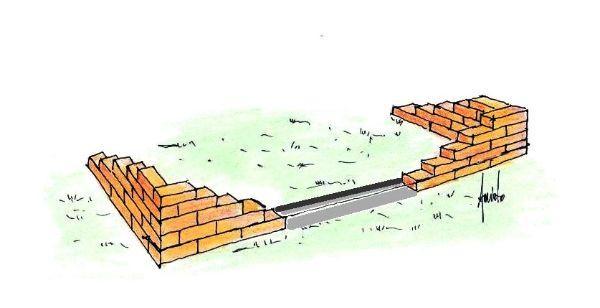
Once built the two progressive corners, stretch the string line between them, fixing the ends with two nails - detectable in the drawing - so as to align the string exactly to the upper edge of the first layer or course of bricks; in practice, during the laying of the bricks, the outside edge of each of them will have to align with the stretched wire.
Settle the first layer of the linear path starting from both ends toward the center.
When it is next to the central part, it is appropriate to lay dry the few remaining blocks, making sure that they fit; only then it will be able to place them with mortar and brick finish with central locking. 
Apply the mortar on both heads of the brick and closing on the ends of two bricks side between which must be placed in interlocking.
This brick panel must be positioned carefully, removing any mortar in excess with a trowel.
Similarly must then be placed the next layers interposed between the terminal corners, lifting and fixing with nails the string line every time at the level of the course in the process of work.
If you intend to build walls up to a meter in height, you must first lift the corners, building them as described to the design quote, then you can complete the intermediate linear parts.
Design of a wall with angular crowning finishing
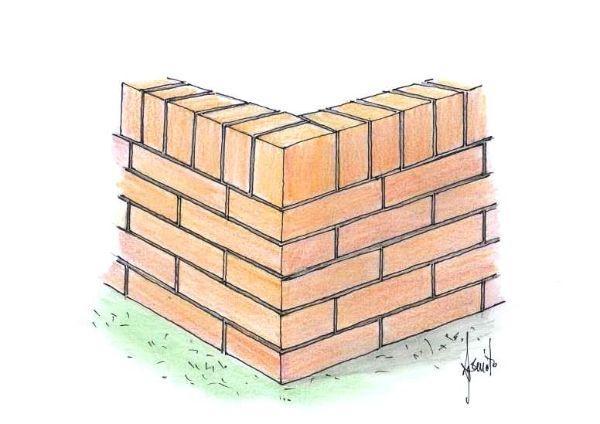
In the following drawing I represented the end result, that is, theone head angular wall suitably finished. 
A rudimentary wall could also end with the last course of bricks laid identically to all the others; nevertheless, an upper layer composed of bricks positioned on the side confers a more professional and agreeable layout, in addition to ensuring a greater compactness to the masonry as a whole.
In DIY mode you can certainly make small artifacts for open spaces, always paying attention to the fundamental ground rules in terms of security, in order to achieve structurally stable and durable.
Expert advice is available online through our exclusive freehand design service, to redesign the interior and exterior of the house, with the creation of new dynamic and versatile volumes, able to make functional and highly personalized any living environment.
79162 REGISTERED USERS


